
Mac computers are better known for their elegant design, user-friendly interface, strong security features, and high-end hardware. However, for someone new to the Mac ecosystem, it can be a bit overwhelming to navigate. If you have recently switched to a Mac from a Windows PC or are using a Mac for the first time, these five tips and tricks will help you get started.
Basic Navigation macOS Beginners Should Know
Before getting to know some basic tips and tricks, the first thing to do when you start using a Mac is to get familiar with the basic navigation, which gives you a general idea of your Mac. Here we list some basic navigation to make you familiar with your Mac device.
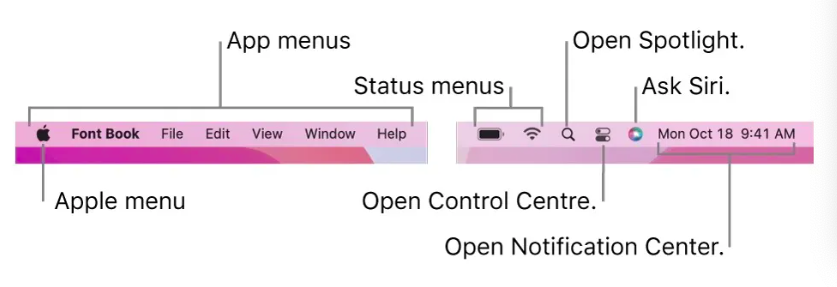
➣ The Menu Bar
The menu bar on a Mac is a horizontal bar located at the top of the Mac screen, which contains menus and controls for various applications and system functions. The menu bar is always visible, even when you're working on a specific application, and it changes depending on the application you're using.
Typically, the menu bar on a Mac contains the Apple menu, which provides access to system functions and settings; the application menu, which contains commands specific to the currently active application; and various other menus that provide access to specific features and settings.
You can access the menu bar by moving your cursor to the top of the screen. When you click on a menu, it drops down to display a list of available commands and options.
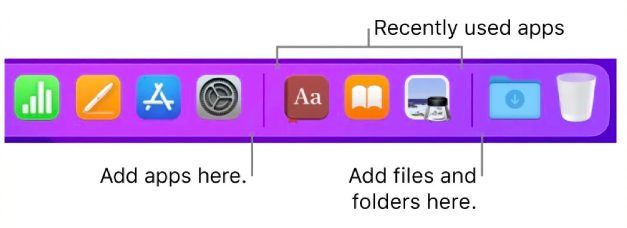
➣ The Dock
On a Mac computer, the Dock is a graphical user interface (GUI) that allows you to easily access and launch applications, files, and folders. It is typically located at the bottom of the Mac screen and displays icons or shortcuts for frequently used or recently opened applications, as well as any other items that you choose to add.
The Dock also includes a few additional features, such as the ability to show or hide running applications, access system preferences, and quickly switch between open windows of the same application. Additionally, the Dock can be customized to suit individual preferences, such as changing its size, position, and the types of items that are displayed.
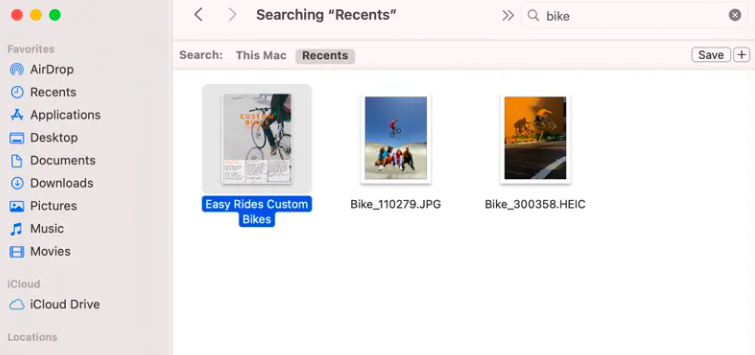
➣ Finder
Finder is the default file manager used on Apple's Macintosh computers. It provides a way for you to navigate and organize files and folders on your computer, as well as access external drives and network volumes.
In Finder, you can view files and folders in different ways, including as icons, a list, or columns, and you can sort files by name, date, size, or other criteria. Finder also provides a search function to help you quickly locate files on your Mac. Additionally, Finder allows you to perform various file management tasks, such as copying, moving, and deleting files and folders.
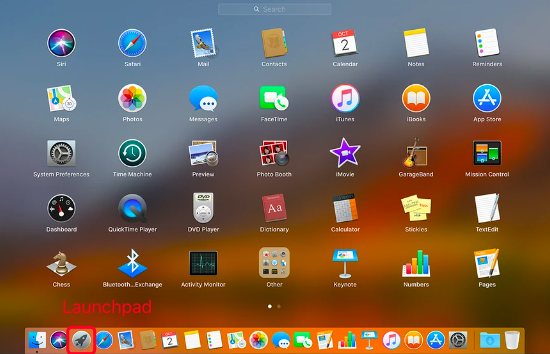
➣ Launchpad
Launchpad is an app launcher that displays all of your apps in a grid format, allowing you to easily access and launch applications installed on your Mac device. It provides a simplified, iOS-style interface with large icons for each application, making it easy to locate and launch programs.
To access Launchpad, you can either click on the Launchpad icon in the Dock or press the F4 key on your keyboard. Once open, you can browse through the icons to find the desired application and click on it to make it launch.
Five Tips and Tricks for Mac Newbies
If you are a Windows switcher and recently bought a new Mac, you might be wondering how to get the most out of your new Mac. Fortunately, the following tips and tricks can help you become more productive and efficient with your Mac machine.
Tip 1: Use Spotlight Search
Spotlight is a powerful search tool that allows you to find files, folders, and applications quickly. To use Spotlight, click on the magnifying glass icon in the upper right corner of the screen or press “Command + Space”. Type in the name of the file, folder, or application you are looking for, and Spotlight will display the results. You can also use Spotlight to search the web, find contacts, and even perform calculations.

Tip 2: Take Advantage of Keyboard Shortcuts
Mac has a lot of time-saving keyboard shortcuts that can help you navigate the system more efficiently. Some of the most useful shortcuts include “Command + C” to copy, “Command + V” to paste, “Command + X” to cut, “Command + Z” to undo, “Command + F” to search, and “Command + Tab” to switch between open applications.
If you’d like to take a screenshot on Mac, press Command + Shift + 3 to take a screenshot of the entire screen, press Command + Shift + 4 to take a screenshot of a specific portion of the screen, and press Command + Shift + 4 + spacebar to take a screenshot of a specific window or menu.
You can find a complete list of keyboard shortcuts by going to “System Preferences” and clicking on “Keyboard”.
Tip 3: Right Click on Mac
On a Mac, right-clicking is slightly different from how it is done on a PC. However, it is still a simple straightforward process. In the following part, we will guide you on how to right-click on a Mac in different ways, including using control-click, two-finger-click, Mouse with right-click button, and Magic Mouse.
Control-click: Control-click on a Mac refers to pressing the Control key on the keyboard while simultaneously clicking the mouse or Trackpad button. This is a common method used to perform a right-click action on a Mac. When you perform a control-click, a contextual menu appears on the screen, providing you with various options depending on the application and the item you clicked on.
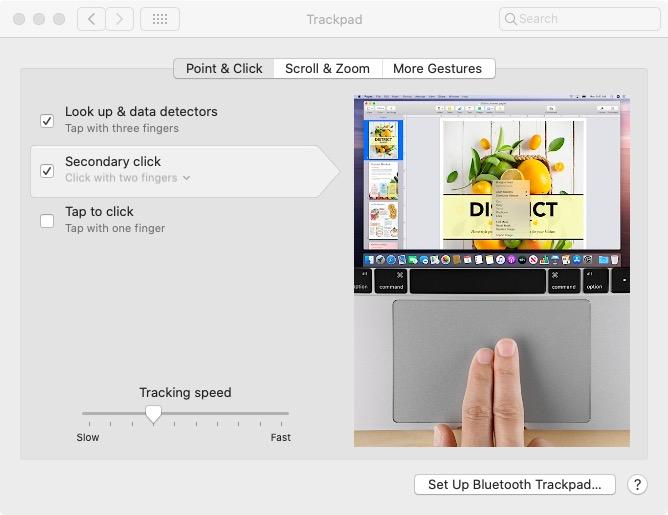
Two-finger click: The most common way to right-click on a Mac is to use the two-finger click method. This method works on MacBooks with a built-in Trackpad or any external Trackpad. To enable the two-finger click feature, open “System Preferences” from the Mac Dock and select “Trackpad”. Under the "Point & Click" tab, select "Secondary click" and then “Click with two fingers”. Once everything is set up, place two fingers on the Trackpad and click both fingers down simultaneously to bring up the right-click menu.
Mouse with right-click button: If you are using a mouse with a right-click button, you can simply click the right button to access the right-click menu. This method is the same as on a PC and does not require any additional steps.
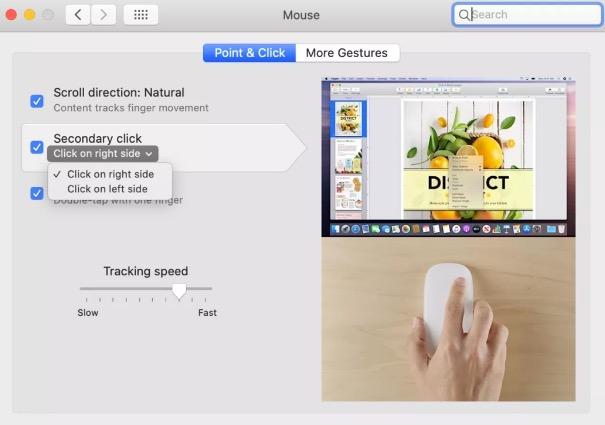
Magic Mouse: If you are using a Magic Mouse, which has a touch-sensitive surface, you can enable right-click functionality in the Mouse preferences. Go to the Apple menu > System Preferences > Mouse to enter the Mouse Window. On the drop-down menu that displays, click "Secondary click" under the "Point & Click" option. Choose either the left or right side of the mouse to use as the secondary click. You can now use the Magic Mouse to right-click.
Tip 4 Customize the System Preferences
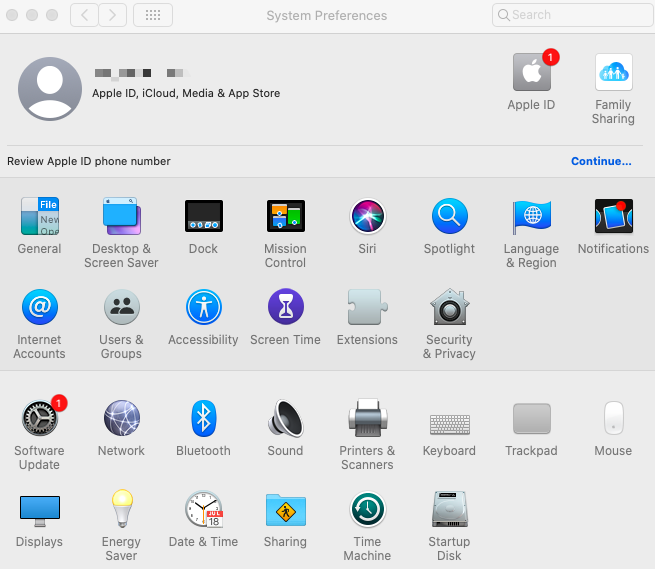
Mac offers a wide range of customization options in the System Preferences menu. Here, you can change the appearance of the system, adjust the settings for the Trackpad and keyboard, and configure various other options.
Once the System Preferences window opens, you can select the category you want to customize from the list of options, such as "Security & Privacy", "Desktop & Screen Saver", "Keyboard", "Time Machine", "Accessibility", "Energy Saver", "Mission Control", “Displays”, and more. Within each category, you can adjust settings and preferences to your liking.
Tip 5 Use Time Machine for Backups
Time Machine is a built-in backup feature that allows you to automatically back up your data including all your personal files, system files, applications, and settings to an external hard drive. To set up Time Machine, connect an external hard drive to your Mac and go to “System Preferences” > “Time Machine”. In the Time Machine window, you can opt to tick the “Back Up Automatically” option or not.
With Time Machine backup, you can easily restore your entire system or individual files from a specific backup point in time as well. This can be useful if you accidentally delete a file or if your Mac experiences a software or hardware failure. You can also use Time Machine to migrate your data to a new Mac.

Final Verdict
These five tips and tricks will help you get started with your Mac and make your experience more enjoyable. By mastering basic navigation, using Spotlight, taking advantage of keyboard shortcuts, customizing the System Preferences, and using Time Machine for backups, you can become a Mac power user in no time.